Archives for category: Uncategorized

The animatronic tail I’m making for ❤ has a pretty simple UI: there’s one button. If you push the button, the tail wags. But if you double-click the button, the tail goes nuts.

Alas, buttons are noisy. As the button is pushed or released, there are many tiny little voltage surges as microscopic ridges and grooves in the switch touch and release as the connection is definitively made or broken. The Arduino sees these little surges and drops and thinks that the button is being pushed and released a few times in 10-20 milliseconds. This is called bouncing, and it is a Bad Thing.

There are tons of approaches for debouncing buttons in software. These all basically come down to ignoring the button for a while after detecting a change. That means that any additional real button presses also get ignored. It’s pretty hard to get the software tuned to ignore bouncing but detect double-clicking. People claim to have done it, but it didn’t work for me.

Debouncing in hardware is a little more involved: it involves building a small circuit with a resistor, a capacitor, and an op-amp integrated circuit. The circuit is called a Schmitt trigger, and the point is to sharpen a noisy set of voltage shifts into a nice square wave: either the button is pushed or it is not pushed, there is no bouncy jiggling.

There are several ways to build a Schmitt trigger, and my hack is shown in the photo. I used a 10KΩ resisistor, a 10㎌ capacitor, and a LMP358 op-amp chip.

IMG_2385

I got the design from Jeremy Blum’s excellent tutorial on this topic. I’ve tested it, and it works incredibly well. Very smooth, no extraneous clicks, and the software no longer has to ignore the button in delay patterns. Yay!


Once upon a time, someone said about Unix regular expressions that if you think can can use them to solve a problem, now you have two problems. What he meant is that regexes are at the same time so powerful and so complicated that they’re hard to debug and hard to be sure that you know what they’re really doing. I feel that way about dremels.

IMG_2379

I use the dremel to cut stuff, like plastic boxes, and in this case, a seriously overspec’d steel motor mount I’m using to fix a stepper motor in a little box to create an animatronic tail for my ❤.

But whenever I get the dremel going, I feel like it’s within an instant of flying to pieces, maiming me, and more importantly, like it might damage whatever I’m cutting. A safety course might be helpful, someday.

I’ve been pretty curious how much energy the mirror uses. However, it’s taken me a long time to figure out how to measure it. For unrelated reasons, I’ve got an arduino that I figured I can use for the voltage measurement.

IMG_2382

The power to the Arduino comes straight from the batteries, so I put a little voltage sensor across the battery feed’s positive + negative. It sends an analog signal to the arduino, and the arduino parses the analog input and sends sends logging info to the Raspberry Pi via a serial connection (note that the Arduino is set to 3.3v! otherwise the serial connection could damage the Pi).

There’s a daemon running on the Pi that parses the Arduino’s serial feed and writes tiny data files to a tmpfs dir. Each time the data reading daemon runs, it writes a file to the tmpfs with one line of data (actually, it writes a temp file then renames it; renaming is atomic, and so avoids a race condition between the serial parser and the data readers). Another daemon reads the data line and logs it. The two-part process means that one daemon can parse the serial data while several others consume it.

In this case, we want the log of the voltages. I set up the test with a single fully-charged battery (a 12v/100Ah deep cycle). Here’s what I found:

blinkybox-volts-by-hours

The mirror ran for over day! That means that having two batteries that are charged by solar during the daytime is much more capacity than we need to run it for 10 hours at night. Good.


One of my favorite project batteries is this 7.4v/4.4Ah Li-ion from BatterySpace. It’s basically four 3.7v batteries (approximately AA sized) packed in heavy shrink wrap.

IMG_2380

The original is the white and green on the left. I needed it to fit the form on the right so it will sit nicely in the project box for the animatronic tail. So I cut it open, and found a little more complexity than I expected.

The batteries are in two packs of 2 each, wired in parallel; the packs are then wired in series. They connect to a little PCB that adds charging and short protection.

The trick is that the batteries have foil tape for the contacts, and I couldn’t figure out how to solder to the foil. I made 3 copper plates with solder blobs for contacts. All 4 batteries connect on one end (two negative and two positive) with a square copper plate. The solder blobs on the plate press into the battery contacts, and I taped it tightly. I soldered a wire to the plate which connects to the common pad on the PCB.

On the positive and negative ends, I did something similar with two rectangular copper plates, one taped across the two positives, the other across the two negatives. Lots of tape prevents shorts, and now I have a battery that fits nicely in the box.

My 2013 macbook pro has started rebooting itself at random, so it’s time to move on. Probably I could get Apple to fix it (and I probably will at some point, these boxen last forever), but I need a lot more RAM anyway, I’d love a faster CPU, and it’s probably time for me to go back to gnu/linux.

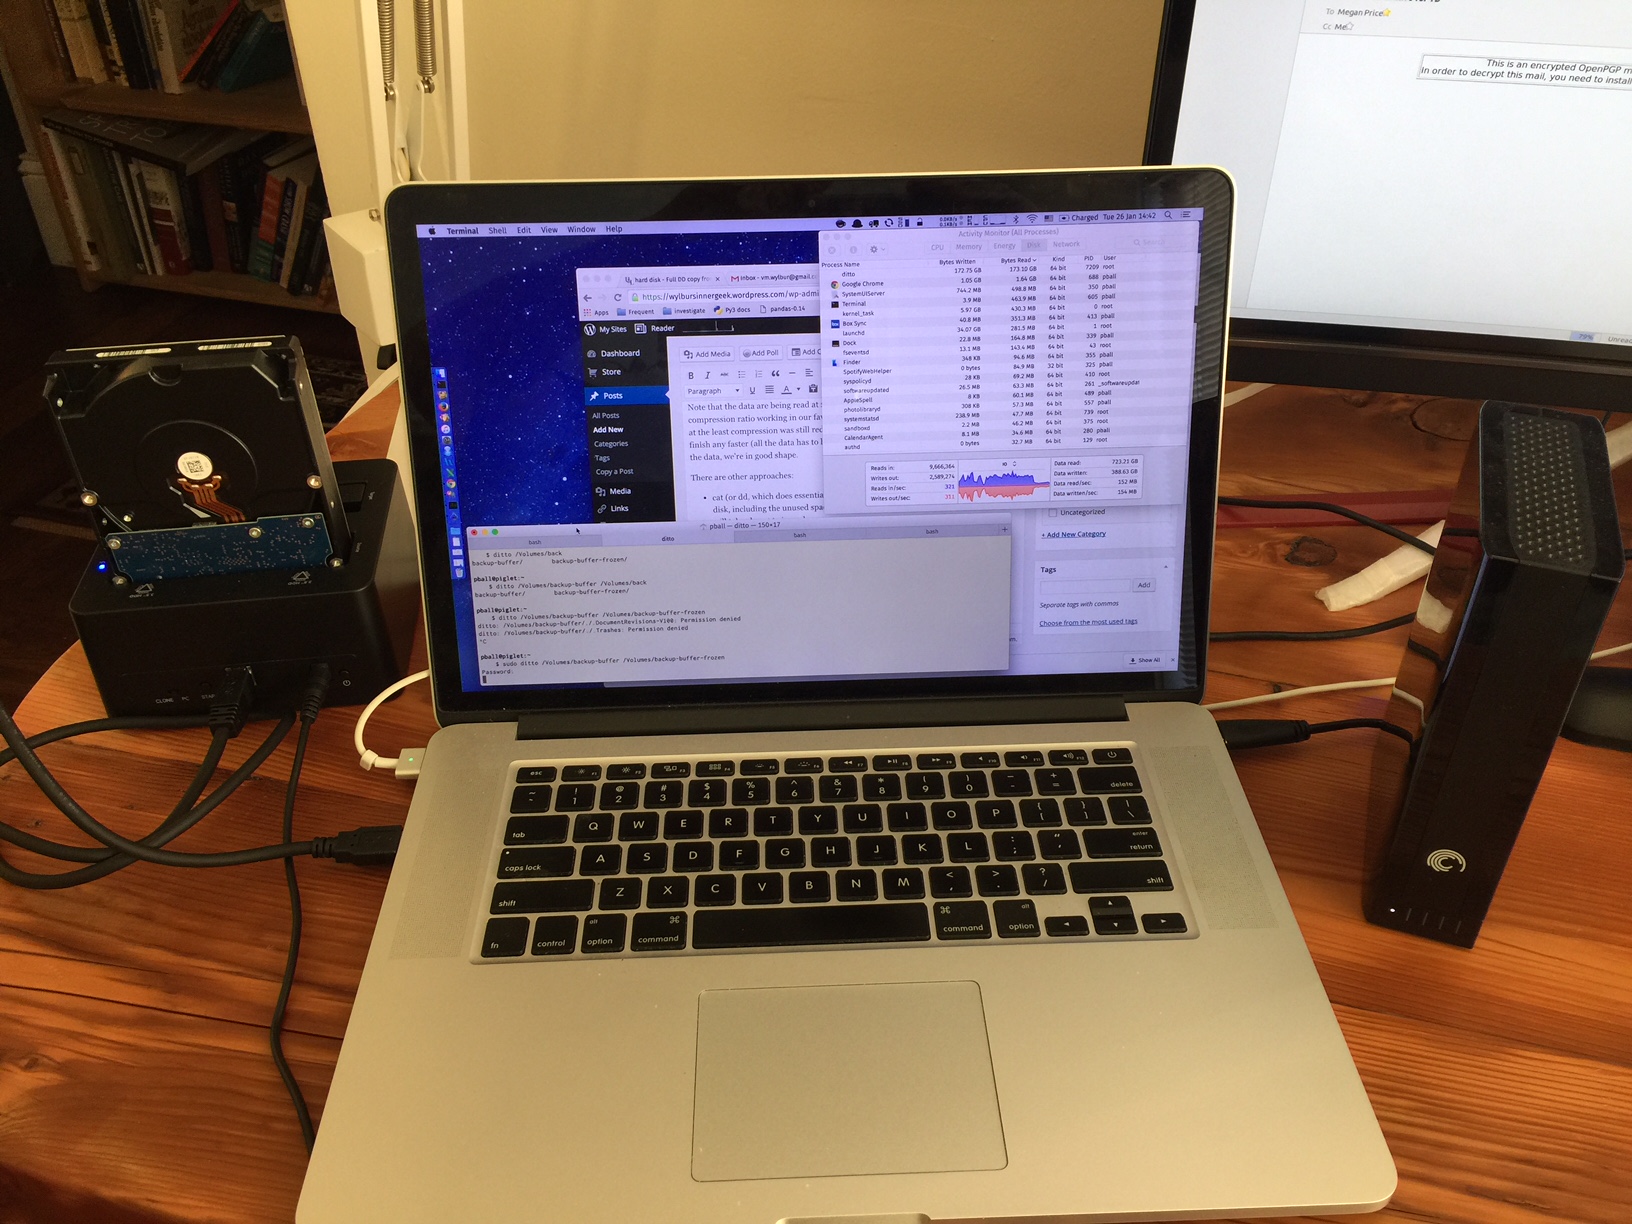
Migrating to a new machine means a lot of file copying. In particular, I’ve got a Seagate 3TB, usb3 external disk I really like. I want to use the Seagate and its fancy housing with the new setup, but first I should archive it to another disk to be put away in case I want to dig it out someday (unlikely, but whatever).

This is harder than it might seem. There is about 1.8TB of data, and the drives each read/write at around 150MB/s. They’re on usb3 ports, which in theory have 5Gb/s of bandwidth, which is more than enough to support both drives working at capacity. I figured writing 1.8TB at 150MB/s is about 4 hours. Do not use a bus, even a usb3 bus, everything slows to a crawl.

Alas, the filesystem is complicated. I use the classic rsync-with-hard-links system for incremental backups (I don’t like TimeMachine which does essentially the same thing because it’s hard to read without using Apple’s GUI). This makes things a little tricky because all those hardlinks (literally tens of millions in each backup iteration, multiplied by several hundred daily backups) confuse Apple’s primitive version of unix.

Primitive? Apple? Why yes, let me tell you more.

The naive way to copy in unix is with the cp command. Unfortunately, Apple’s BSD-derived cp doesn’t handle hard links properly. Unlike gnu cp -a, Apple’s cp copies the file rather than copying the link. This would explode the data into petabytes.

The way that Apple recommends to copy entire filesystems is with ditto. This preserves Apple’s special metadata, though ultimately I didn’t want or need that. ditto this turns out to be one of the two best ways to accomplish this task.

The old-timey unix way is to use tar (note the link to gnu-tar, Apple tar is weaksauce), something like this:

    $ sudo gtar -cf - /Volumes/backup-buffer | lzop -1c > /Volumes/backup-buffer-frozen/mac-backup-20160126.tar.lzo 

Note the sudo, there’s a lot of broken permissions going on in there. That will need attention at some point. Note also that I’m using lzop to do a little bit of compression. This isn’t strictly necessary, but I thought that lzop could probably keep up with tar, and in tests, I was right. The time lzop needs to compress the data is less than the time tar needs to read it off the disk, so lzop doesn’t slow the process at all. For the record, the multithreaded compression options (`pigz` and `xz -T0`) are slower than single-threaded lzop, even when lzop is compressing more aggressively (I got to about -4 before lzop slowed down the writing). Impressive stuff, lzop.

throughput

Note that the data are being read at 219 MB/s and written at 67.3 MB/s. That’s the compression ratio working in our favor (more read, less written). Overall I found that lzop at the least compression was still reducing the output by about 30% (it’s winning on csv’s and sql dump files, and losing on photos, zip, gz, and bz2 files).  It won’t help the job finish any faster (all the data has to be read, after all), but when the bottleneck is reading the data, we’re in good shape.

Ultimately I don’t care about how much space it takes. What I want is a disk I can drop into an external SATA-to-usb3 housing and find a file that I may have otherwise lost. An uncompressed, unarchived result is probably best.  I could have used a double-ended tar:

    $ sudo gtar -cf - . | ( cd /destination/dir ; sudo gtar -xpvf - )

I noticed that tar slowed to a crawl when it hit directories that are all hardlinks. For example, each daily backup has maildirs with thousands of files, but they’re all hardlinks. When tar hit those dirs, it slowed to about 3MB/s. Apple’s ditto had the same slowdown, but it did, at last, finish, in 1247 minutes.

There are other approaches:

  • cat (or dd, which does essentially the same thing) would completely duplicate the disk, including the unused space. Since I’ve got 1.8TB on a 3TB disk, that means it will take almost twice as long as necessary. Furthermore, the resulting copy was not recognized. There are subtleties about whether one is copying the partition or the whole disk, and I couldn’t get it to work.
  • rsync, suggested by many. However, rsync crashed repeatedly with a “filename too long” error. The offending filename wasn’t very long (though the path was, but that shouldn’t be an issue), and anyway, rsync wrote the damn directories! This left me scratching my head.
  • Apple’s asr tool, made for copying disk images. Nope — it fails, complaining about problems with the directory structures. OSX’s disk utility can’t fix this filesystem, it just hangs (all those hard links, again), so we’re done here.
  • One I haven’t tested: first use find to make a list of the files we want, then split the list into pieces, feed the pieces to cpio in copy-pass mode into the destination. This sounds like a good idea, but would disk contention on the target slow it down too much?
  • One I haven’t tested: dar which seems like a good candidate to produce a usable, compressed archive. Nice to be able to extract a file from the archive without opening the whole archive.
  • One I haven’t tested: fast-archiver, which works natively in parallel.

IMG_2083

Slobberchops (possibly aka Moop Man) and I added the final touches to the Magic Mirror literally minutes before Biggus Dickus helped us box it in ridiculously heavy plywood and pack it on the truck for shipping to the playa. We weren’t sure it would work outside the lab. Would it break in shipping? Would a show-stopping bug emerge? It was all worth it, because it totally worked.

A couple of qualifications about the video: the shadow effects (constantly shifting shadows behind the diffuser added depth to the image) are only barely visible, but they were amazing when you stood in front of it. The camera couldn’t handle the colors well (it tends to blow out when the exposure shifts quickly), but in person, the colors were very smooth & creamy, with the dithering doing its job remarkably well.

Every night many people played with it. This was my first piece of big art on the playa, and I am still pretty amazed at how happy people were and how much love they gave us for it. Yay!

Note to self: 12v/100Ah batteries are Very, VERY Heavy to schlep, but solar is a wonderful way to get DC power. It Just Worked. We got ~400W/hour, and the batteries were charged every day by 10 or 11am. It definitely made me think about how much more blinky goodness we could wlre up.

I’ll write up the build details at some point; there are a lot of photos, and quite a few more videos with equally bad color. But meantime, let’s all dance with the lights.

The LEDs are really bright, which could be irritating. We need to see what the video feed looks like, but I’ve been thinking a bunch about how to spread the light from each pixel into a blurry blob. Or, even better, smear the light into a blob that somehow changes.

Earlier diffusers were either crappy looking or too heavy; I loved how the translucent rocks look, but they would be ridiculously heavy. Photo diffusion paper looks good, and so do sheets of HDPE cut out of shopping bags, but they’re flat and static.

What if we had HDPE bags crumpled on thin rods, like a trash skewer on a BBQ. With a diffuser on top, the bags would cast irregular and moving shadows on the top diffuser. Like this:

So my current idea is to drive say 10 rods, each with a stepper motor, with all the motors driven by a Pololu Maestro. We’ll probably control the Maestro with python (as in this example). An example of a full pytohn-on-Pi-Maestro-servo setup is here.

I don’t quite understand yet how to chain the motors to the rods. However, turning them slowly, and having them stop for long periods, might make the effect all the more interesting.

For the future: a python library to talk to the Pi’s GPIO pins is here.

My friend Wheat-Thin built a box for this version.

Wheat-Thin's box

I painted it white and taped six strands of 10 LEDs each to it.

Front of Mirror with LEDs

The signal and ground wires are soldered to the top of each strand, and 5v and ground to the bottom of each strip. The wiring is pretty simple.

Mirror wiringThe signal and ground wires from each strip go to the Fadecandy (FC, the board in the upper right on the white pad). I made a 6×2 wiring harness with female headers, and put an 8×2 male header on the FC for the connection. Power is supplied by the 8.4v NiCd batter on the bottom. All the grounds go to the ground bus on the black pad on the right.

Ground busThe bus is a piece of 1/2″ copper pipe smooshed flat with wires soldered to it. The pipe is secured to the box with 10 lbs double-sided tape on top of electrical tape which is on top of duct tape (electrical tape sticks to duct tape but not to wood; the duct tape sticks to wood).

Power runs up the left to an on/off switch, then to a 7A voltage regulator (on the white pad, center left). A voltage monitor is attached to the regulator’s Vin headers to keep track of the battery’s power. 5v comes out of the regulator to the power bus (on the red pad). The 5v and ground wires from the LED strands are attached to the buses. It kind of works.

A couple of notes: the diffuser is just a sheet of grocery bag HDPE I’ve taped over the LEDs. I’ve set the LEDs to use a max of 50% of their power, and they’re still much too bright.

Lots remains to be done: the camera needs to be attached, configured, and understood; the Raspberry Pi needs to be mounted and powered from the battery (not simple, needs another board); the software needs to do something comprehensible (maybe I can figure out the python stuff?); and we need to come up with a better diffuser than this piece of plastic.

However, lots has been accomplished. I’ve figured out to make buses out of copper (and that will handle the load) for the production version. I’m starting to get a better sense of what the diffusion needs to do. I understand a little more about the Fadecandy server configuration (the explanation at Adafruit is the best).

This year’s theme at Burning Man is “Carnival of Mirrors.” I thought: I can build a mirror. These are my first steps.

I was inspired first by the combination of two projects. First is Adafruit’s 1500 pixel blinky curtain. This massive number of pixels are made manageable by the Fadecandy board. From the inventor’s page (linked left): “The Fadecandy Controller hardware drives up to 512 LEDs, arranged as 8 logical strips of up to 64 LEDs each. It connects to a laptop, Raspberry Pi, or other embedded computer over USB.”

Image by Micah Elizabeth Scott

Image by Micah Elizabeth Scott

The next inspiration is a piece I’ve seen online (and lost) of a camera + Raspberry Pi + LED array mirror. Apparently there’s also one at the Exploratorium but I haven’t seen it.

The idea is to feed a video camera’s image to a big LED array (perhaps 50×30 pixels) so that the participant’s image is reflected in a highly pixelated, mediated version. Lots of diffusion, no visible pixels; this is the post-pixel era. The Fadecandy drives new-style Adafruit LED strips.

First, a brief review of blinky tech evolution. Once upon a time, LED strips had two leads, one for clock and one for data. The new style strips have only one lead for data. This is better, but that means that the first prototype is Arduino-based, not Fadecandy-based. I had a bunch of the old style strips around, so I cut them into 6-pixel lengths, and made this.

Mirror-proto1-1-1

All the usual pieces are there: a voltage regulator, a power bus (on the breadboard), an Arduino Mega, and lots of poxy soldering. On top I added a diffuser made of translucent rocks.

Ok, that’s the basic idea. I have a lot more work to do on the diffuser. Diffusion paper? Rag vellum? HDPE? Not solved yet.

The next step is to test the Fadecandy. This was way, way easier than I expected:

The Adafruit tutorial on Fadecandy, the Fadecandy server, and the Processing language make this essentially trivial. Next up: a 10×6 array connected to the Fadecandy, in a proper frame, integrating the camera and Pi, and better diffusers.

I’ve been to the playa in RVs many times, and it always sucks. The RV cabinets break, the bathroom smells horrible (even if you don’t use it, which you shouldn’t), the grey water is always overflowing, it uses a zillion gallons of gas, and it always costs way more than it should.

So last year we built hexayurts, and they rocked. We started with a little model.

IMG_0981

The idea is that the six-sided building is created entirely (or nearly so) from 4’x8′ fiberglas panels. It folds flat for shipping, then it folds out on the playa. I’ll just narrate our building process briefly here because this is all very well documented all over the net. In particular, we recommend Camp Danger’s howto videos.

First, prepare yourself for a lot of taping. You spend hours, even days, cutting panels and covering the exposed fiberglas with massive sheets of giant packing tape.

hexayurt-1-7564hexayurt-2-7567

Then the pieces get taped together. There are two kinds of taping: the permanent hinge taping, and the installation-specific taping. I’ll leave all the explanation to Camp Danger, but suffice to say here that you have to pay close attention.

hexayurt-4-7587

We added a plywood cover to the door side, and that turned out to be a big win. The plywood attaches to the door by bolts and big washers which can be seen in the picture below.

hexayurt-5-7593

Then we cut windows into two sides. One of the many advantages of hexayurts is that they pack flat. This helps SO MUCH.

IMG_1040

We were only on the playa for 5 nights, and it wasn’t all that dusty in 2014, so we didn’t test the yurt as intensely as possible (I don’t have any on-playa photos). However, it was spacious, cool, and easy to setup. I can’t imagine a better way to habitate. Highly recommended!