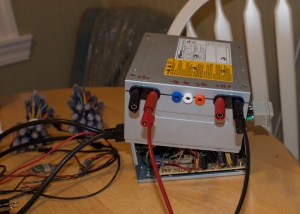
It’s a standard hack: take an old computer’s power supply and turn it into a clean source of DC power for electronics hobby-izing. There are great youtube videos, wikiversity articles, instructables, and blogs about how to do it. One more can’t hurt, but I’m not going to talk about which wire goes where or what resistors to use. There’s already plenty about that on teh interwebz.
The point is to save money, I think. ATX power supplies are essentially free as people dump desktop machines in favor of newer desktops (rare) or laptops (nearly everyone). So go harvest. But for me, the bigger point was to practice project planning, doing soldering, integrating components. In pursuit of the blinky coat, I don’t feel that my skillz are there yet.
Earlier this week I tried the first time. In short, I forgot the “lay out the interface first” rule. Power supplies are generally built on a chassis with a second piece of metal that slides on as a cover. On most power supplies, the chassis pieces extend on two sides, holding the fan and AC input on one side and a lot of mesh for airflow on the other. No problem, I though, I’ll put the binding posts on the cover. Very, very bad idea.
I got the thing working, briefly, but there were a lot of shorts. Here are the lessons I took away:
- Everything fixed must go on the chassis so the top can be moved aside. Don’t complicate opening the box by wiring stuff to the top pieces.
- Make sure everything you plan to solder can be pulled out and worked on in the open. This is a planning step.
So the first attempt failed. The wiring got in the way of the box closing. Although the power on the binding posts looks good, I figured that catching fire was a likely outcome. I ditched it and harvested another power supply.
This time I took a lot more time figuring out how I’d lay out the binding posts, LEDs, and switch. I pulled the fan out and moved it to the front of the box to make room.
Then I cut away the grill where the fan used to be. Turns out that the aluminum sheet is so soft I could cut it with wire snips.
Using a Dremel, I cut an aluminum plate from an enclosure I had. This is the plate on which the binding posts, LEDs, and switch will be mounted.
One of the several failure modes I had in the first try was trying to solder a dozen-odd wires to the binding posts in place. Not only was I wrapping a giant mess around a tiny post, I was doing so underneath and behind piles of other wires. Most of the online instructions to do this mod skip this part, saying breezily “connect all the yellow wires to the yellow (12v) post.” Uh, how do you connect that many wires to a single post? I decided to simplify by cutting each wire bundle as short as possible. Later I’ll wire-nut them together with a single strand that runs to the binding post.
Next I drilled holes in the plate and mounted the binding posts on it. Wow, am I a crappy craftsperson. I couldn’t get the holes to line up neatly, alas. For the holes for the two LEDs, I got the holes slightly too large (I was using a multibit, which is tough to feel as you drill through soft aluminum). Some liquid electrical tape secured the LED holder outer ring in place.
Next I set up a circuit for the LEDs. They each need to share a ground with the switch (which I figured out how to solder from this video), then a resistor (330 ohm), before connecting to the LED negative side. I wired the resistors inline, and connected all the grounds via a pigtail. Note to self: with heat shrink, less is more. Cover the solder, but don’t go crazy, it just makes the wires stiff and hard to work with.
You can see the resistors peeking out from under the shrinkwrap. They’re there to prevent the LEDs from frying (they want approx 3.3v but they’re getting 5v). Hot glue fixed the LEDs into the holders.
ATX power supplies need a load or they won’t turn on, and the standard hack is to put a 10 ohm/10w resistor between a 5v (red) line and ground. I did it inline, and hot-glued it to the chassis wall.
Finally I bolted the panel on and ran all the wires from the panel to the pigtail bundles. For each bundle, I zip-tied the bundle with the wire from the panel, twisted them together, soldered them, screwed a wire nut on top, then put a couple of turns of electrical tape. The wire nut obscures the zipties, but they’re key to keeping order.
Turned it on, and it works! No burning smell 🙂 even after an hour of driving 13A of blinkies.
 Yay! This will be very useful as the blinkies go into advanced testing. It was also a good lesson in project planning and assembly skills, which was the point, after all. And doing it, I wonder if I need a better soldering iron. I’m seriously in a tool orgy in the last couple of months, and it does feel good.


