I often find myself trying to figure out how to bolt something into wood. Say I’m attaching the side of a wooden box, but I want to be able to remove it later. Ideally I’d have a threaded hole, but of course wood won’t hold a thread. I don’t want to use a wood screw because after I’ve taken the screw in and out a few times, the hole will be reamed and won’t hold.
I could use a threaded insert, but the smallest ones I can find are #8, and they require a pretty big hole. And of course I would have to remember to order them a week or so before I start building.
Here’s my newest idea. For a #6 bolt, I set up the drill press and used a forstner bit to drill a 3/8" hole about 3/16" deep, then a 11/16" center hole. I set the nut into the hole made by the forstner bit with a little Amazing Goop from my favorite hardware store. (everyone should have a hardware store they really like, I think)
I needed to clean the threads a little but it seems to work pretty well. The key is that the nut must stay in place when the bolt hits it. If the nut falls out into the inside of the box, it fails. I was able to break the adhesive by threading the bolt halfway into the bolt, then pushing the bolt out of the wood. I pushed hard enough to leave a dent in my thumb for a couple of minutes, and I think that’s probably strong enough. Notes: cyanoacrylate glue doesn’t really work at all; and gorilla epoxy is kind of a pain to set up but it sticks the nut onto the wood a little better than Amazing Goop.
Once the bolt is seated, all’s well — the bolt’s pressure will draw the nut into the board I’ve set it into. This is going to be a go-to solution for me, I think, but I might need to tune the adhesive a little bit.
One of the electronics maker’s "hello world" projects is converting an old desktop computer’s ATX power supply to a DC bench power supply. I’ve built 3 or 4 of these over the years, and I generally blow them up by shorting them when I’m testing a new circuit. They can take a little bit of abuse, but not very much. I’ve thought about lots of ways to create protection circuits to shut off if there’s too much current drawn (like in a short), but let’s be serious: I’m never going to build a really good power supply.
But I’ve kept trying, if only because good power supplies are $400+, and I’ve got a bunch of ATX stuff lying around. A few weeks ago, I decided to try again with parts I have on hand, including a breakout board that converts the ATX jacks into separate +5v, +3.3v, +12v, and -12v screw terminals. Each voltage has its own jack and on/off button, and the buttons drive relays so the power is isolated from the controls. The buttons light up when there’s power at that jack. Plus there’s a jack that can switch between 3.3, 5, and 12v, and it runs through an ina260 so I can monitor the true voltage and current. Nifty! I thought.
In the photo below, the power supply (the vertical plastic box) is connected to a constant load (I’ll write about this another time). What you need to know about a constant load is that I can set it to draw a fixed current, say 1000mA, no matter what the voltage is.
Here’s the thing: maybe the most important reason we build a constant load is to test power supplies. The idea is that if we tell a power supply to give us, say, 5v, it should give us 5v no matter how much current we try to draw (up to the supply’s capacity). This is what a good power supply would do, anyway. It turns out that ATX power supplies rather badly fail this requirement.
My constant current load runs the power it’s drawing through (yet another) ina260 board which is monitored by an arduino. I did this so that the constant current load can log the voltage and current (and some other stuff, like the temperature of the mosfet that’s burning off the power as heat); the log is written to the serial output through USB (you can see the USB glowing blue, I love cables that blink). From the data generated by the constant load’s cycling through a range of currents, I have created the graph below.
This is Not Good. We want the lines to be flat, that is, we want to see the same voltage at every current. These are not flat. For example, the 5v supply drops from 5.3v at no current to less than 4.5v at 3300mA. This power supply claims to be able to provide 10A at 5v, and nope, that’s just not true. While the proportional loss for 12v isn’t quite as bad, 3.3v is worse.
I think I need to stop messing around with these crappy ATX power supplies. I’ll just build a box with a bunch of jacks — and remember that the voltage is srsly unreliable.
I have a Siglent SPD1305X, and it’s great for one voltage, but I find myself needing several voltages at the same time. Furthermore, I sometimes need a negative voltage source. I guess I’ll start saving for a Siglent SPD3303. It can do all the power things.
A few weeks ago my house was burgled, and the thief stole most of my construction tools. I was devastated. However, my friends came together and created a fund that has enabled me not only to replace the stuff that was stolen — I’ve also been able to add a big new tool. Wow, my friends are great!
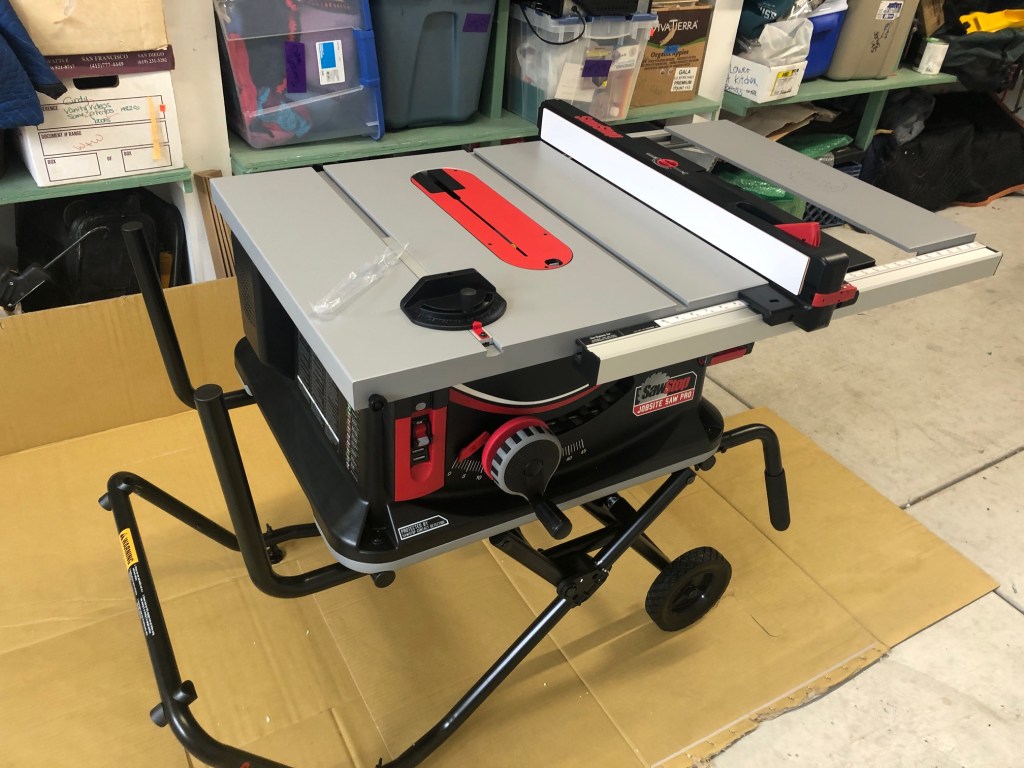
The tool I added is a SawStop Jobsite Table Saw. I got it for a lot of reasons; here are the top two. First, I want a table saw big enough to cut big plywood but small enough to store in the garage. This one is pretty easy to move around on its integrated hand truck.
Second, I wanted a saw with tech that recognizes a finger and refuses to cut it off. I’m very, very impressed by the testimonials from YouTubers I admire (like this one and this one) about how the SawStop actually stopped and they walked away from a situation where they could have been very seriously injured.
A table saw blade turns about 4000 rpm, the teeth are moving at about 200 feet per second, around 1365 mph. The teeth point toward the user (into the board you’re cutting), so the teeth can (and sometimes do) catch a finger and pull it into the blade. It happens so fast that you can be seriously injured multiple milliseconds before a signal can make its way to your brain. I decided to do the math.
A signal from hand to brain takes about 20-40 milliseconds (that’s just the transmission time, not considering any thought from the brain, let alone a reaction and retransmission). In half the shortest possible transmission time, 10ms, the teeth on the blade move about 2 feet. There are 50 teeth on my blade, so in 10ms, about 30 teeth pass through a given point. When I hit my hand slowly on just one tooth (like when I’m installing a blade), I get a good nick. 30 teeth (driven with effectively infinite power) could easily sever a finger in half the time it would take for the signal to reach my brain.
This model has a capacitive touch sensor in the blade. When it touches something conductive, like, say, a finger, it stops in <0.0004 seconds, which is less than the travel time for one blade tooth. The videos and testimonials are amazing. I love the one where they push a piece of steak into the blade and it stops with only a tiny nick. I bought this model bc I think it will reduce the chance of losing something important when I’m distracted for an instant.
However, I’m a little sad I can’t also have a hyper-precise Byrnes Mini Saw. It looks absolutely gorgeous. However, they’re not being made right now, and it would really be too small for anything other than building small enclosures for my electronics. But then again, most of what I want to do is build small enclosures. You can see the dilemma.
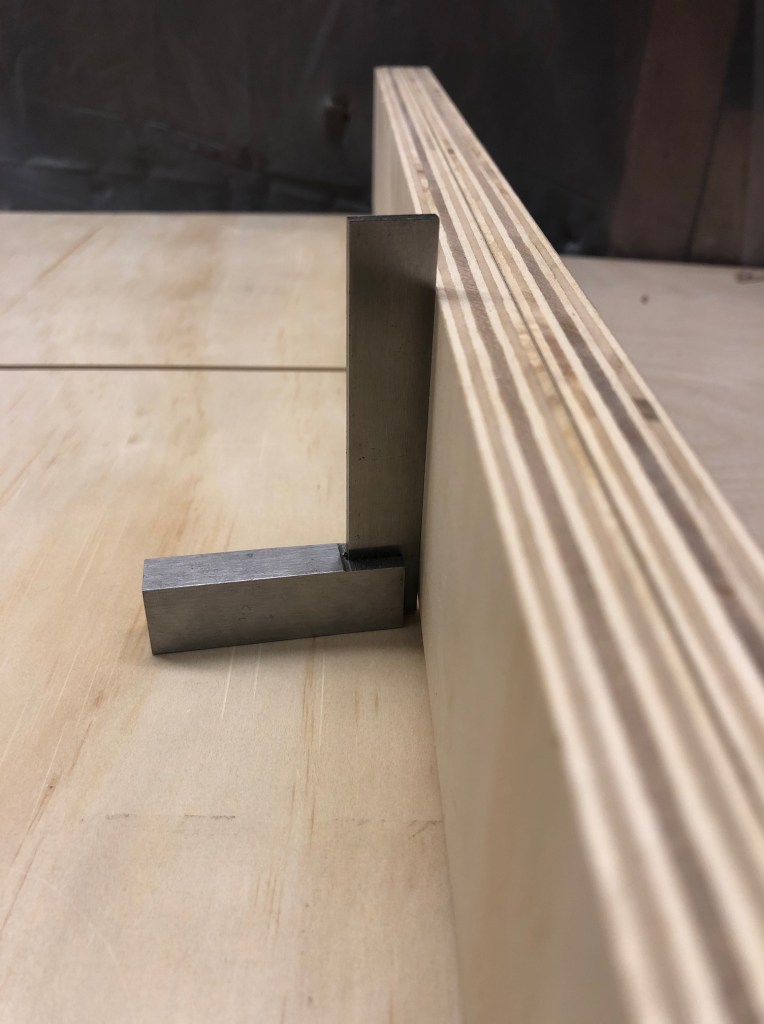
Availability won out, and I got the SawStop. Right away I noticed that making cuts with the fence isn’t precisely square. The key test is to cut a board on each side in turn, and then check square on the final cut. A simple cut using the saw’s fence is not all that close: look at all the light under the rule.
I decided to build a cross-cut sled, which seemed to me perhaps the most fundamental helper tool for a table saw. I followed the basic pattern described by Tamar at 3×3 Custom, though mine is somewhat simpler. There are tons of videos online about how to do this, so I’ll hit the highlights:
cut plywood for the back and front fence; I used two sheets of 1/2" glued together. I clamped them to a monster 1/4" thick chunk of aluminum L frame I have from an old project to make sure that as the glue dried, the fences stay as flat as possible. After they dried, I trimmed them so they are flush.
I cut runners out of a maple board; I used the sneak-up-on-the-cut method that Newbie Dan describes. I don’t know whether I cut the strips properly to account for how they shift with the weather. I used a Grr-Ripper to control the wood as I cut it. (btw I like the Grr-Ripper a lot).
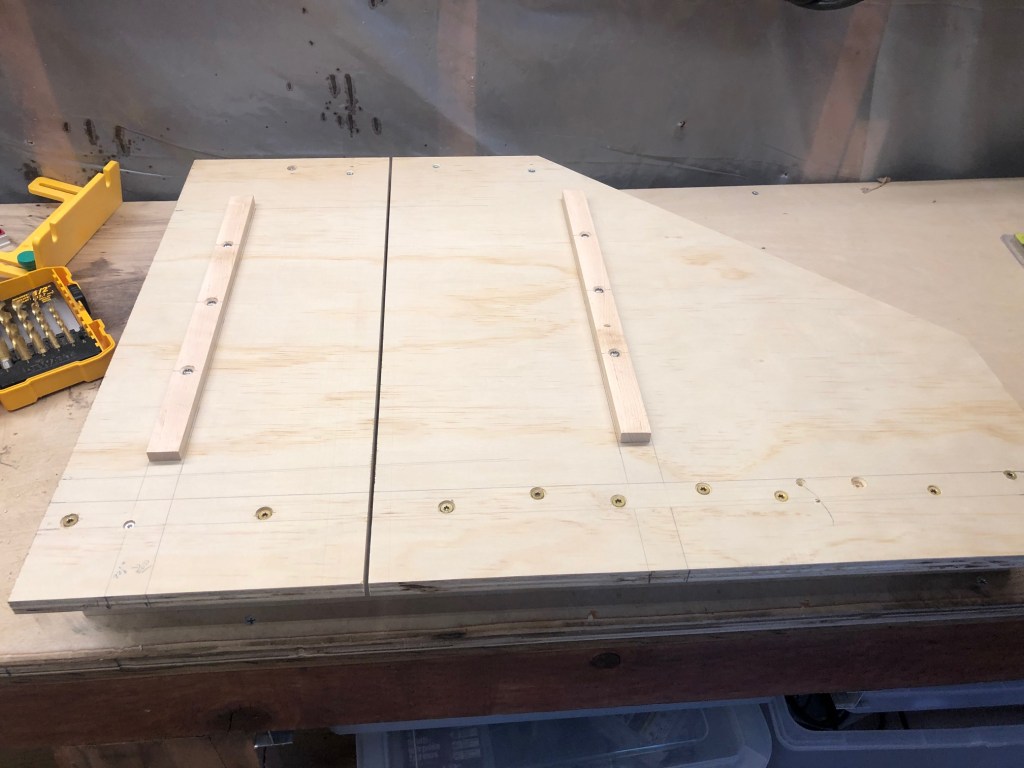
The image below is the bottom of the sled after I secured the back fence with a zillion screws.
The sled itself is about 18" deep by 24" wide, with a big chunk cut off the back left where I don’t think I need too much support and I can reduce weight (this idea comes from Tamar).
By far the most important part of the sled is getting the back fence perpendicular to the blade. There’s an amazing trick for this, invented by William Ng, called the "five-cut" method. The idea is to cut a board on each side in turn. The error (i.e., the amount the cut differs from perpendicular to the blade) compounds with each cut because the cut side becomes the base of the next cut. The amplification of the error makes it easier to measure and to correct.
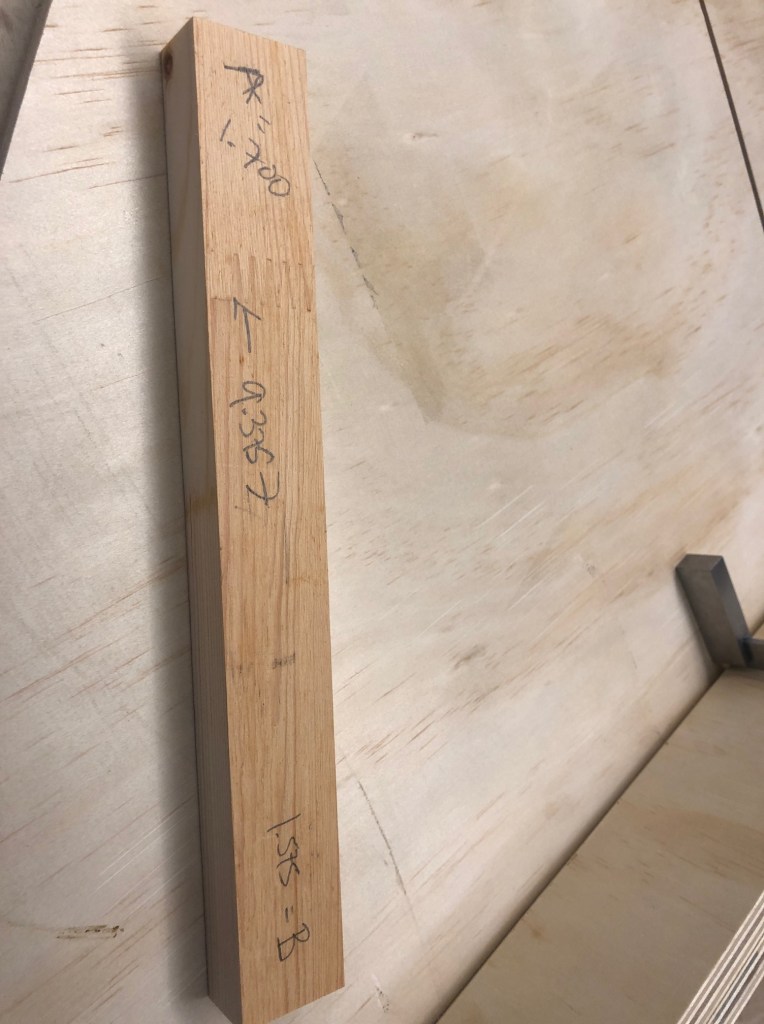
I’ll leave the explanation of the method to others – there are tons of great explanations of how to do the cuts and the calculations. Here’s my final cut with the associated measurements.
(note: the A measurement is 1.1700, and B is 1.1575; when. I wrote on the board, I omitted the ‘1’ in the tenths position, oops). From this, you can calculate that my sled’s error is ((A-B)/4)/len(test) = 0.00033 per inch. That is, cuts made with this sled will be off square about 3 ten-thousands of an inch over every inch of cut.
So if I cut a board 24" square, the diagonal in one direction would be around 0.02" different from the diagonal in the other direction. I can definitely live with that! Of course this sled is too small to cut 24" square, but you get the point.
This is a first attempt. The runners aren’t great, the fences should be 3/4" rather than 1/2", and the whole thing should be made of higher-quality plywood. But it’s a great "hello, world" with my new saw.
And it’s a great lesson that in woodworking (probably in other areas, too), the great tool only gets you part of the way. There’s some skill, sure, but also some technique (which isn’t quite the same as skill).
Finally, I’m really glad to have a way to cut seriously square. This is a great first post-burglary project. I’m deeply grateful to my friends.
PS: yes, we changed & upgraded all the locks, and we added cameras that save video to an online repository (the "cloud"), but crucially for me, the cameras do not connect to the police. And in the garage, the saw is chained to a bolt drilled & epoxied into the foundation. Of course we could be burgled again, but it’s going to be tougher for the next thief.